
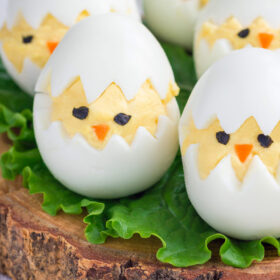
There’s no better way to use up all those hard boiled Easter eggs than by making a tray of Deviled Egg Chicks. They’ll be the hit of your Easter dinner table.

We always have a ton of hard boiled eggs left after we’ve dyed them all kinds of fun colors for Easter. What in the world do you do with all those eggs? You can only eat so many plain eggs. That’s where this fun little appetizer comes in.
Use your leftover eggs to make a tray of these deviled egg chicks that can be served as an appetizer or as a side dish on at your holiday brunch or dinner.
The best part is that these aren’t just your typical deviled eggs laying flat on the tray, waiting to be eaten. They’re a centerpiece all on their own.
» You might also like these Mexican Street Corn Deviled Eggs.
How to Make Deviled Egg Chicks
These deviled eggs are easy to make, but they do take a little bit of time.
The most time consuming part of making these eggs is cutting the top off. But we think it’s definitely worth it to take the time to make the jagged cut. Don’t worry, we have a quick way that will help you make the cut.
Step One: Cut the tops and bottoms of the egg
It’s a little time consuming to cut the top half off the egg.
All it requires is either a drinking straw (plastic or paper will work), or a piece of tin foil.
If using a straw, cut off a 3″ piece of it. Pierce the straw together in your fingers and cut up the middle of it on one side. Crease the straw piece so it forms a V shape.

Use this tool to pierce the V shapes into the egg all the way around it. It takes about 10-12 pierces and they don’t have to be very deep. Just get through the whites of the egg.

If you don’t have a straw, you can fashion a piece of tin foil into a V shaped piercing tool. Or you can use a paring knife to cut each slit.
If you don’t want to put the extra time in, you can just cut a straight line around the top of the egg with a paring knife.
Now you can remove the egg top. Peel it back carefully, so you don’t break the egg white.
Once the top is off, cut a flat bottom, so the egg will stand up on the plate.
Step Two: Mix the filling
Once you’ve cut the tops off the eggs, scoop out the yolks and add them to a bowl. Some of the yolk might be contained in both the top and bottom. I prefer to do this part manually in a bowl, but you can mix up the filling in a food processor or with a hand mixer, if you wish.
Add in the other ingredients: mayonnaise, salt and vinegar. Mash up the yolks with a fork. Then stir it all together until it’s smooth. You can make it as smooth or lumpy as you prefer.

Step Three: Fill the eggs
Now you can return the filling back into the eggs. You can do this with a piping bag or just by scooping it in with a spoon.
Once the eggs are filled, put on the tops. Then put in the eyes and beak.
I use little flakes of black pepper for the eyes. You could also use black salt. If you don’t have either of these, be creative. I’m sure you can find something in your kitchen to use for eyes. For the beak, I use a tiny triangle of carrot.
YOU MIGHT ALSO LIKE


Like it, Love it, Want Some More of It? Subscribe to our YouTube channel to watch us cook and follow us on Pinterest, Instagram and Facebook. We really love it when you save our recipes to Pinterest 😊
Deviled Egg Chicks
Ingredients
- 12 hard boiled eggs
- 1/3 cup mayonnaise
- 1/2 tsp Dijon mustard
- 1/2 tsp apple cider vinegar
- 1/2 tsp salt
Instructions
- Peel and wash the eggs. Use a v shaped tool, like a straw cut down the middle and folded, to cut a jagged top off of each egg.
- Cut a flat bottom on each egg. Cut off the smallest amount of egg white to make a flat surface.
- Carefully remove the yolks and put them into a bowl or food processor.
- Add the remaining ingredients and stir or process until smooth. This can be as smooth or lumpy as you prefer.
- Scoop or pipe the filling back into the eggs, piling it up as high as needed to make a face on each egg. Put the tops back on the eggs, making sure there's room for a face.
- Add the eyes and beak.
Notes
- Use the freshest eggs possible. They not only peel easier, but they are sturdier when you cut them.
- Use a plastic or paper straw, or a piece of tin foil to cut the v shapes.
- Piping the filling into the eggs is the easiest method.
Nutrition
Like it? Pin it!


Laura is a home cook, with 25 years experience behind the stove, who spends an extraordinary amount of time in the kitchen cooking. She loves making new recipes and finding wonderful new things to eat, both at home or abroad. She spends a lot of time researching, crafting, and perfecting her recipes.
Such a fun and cute recipe for Easter! Great way to enjoy deviled eggs; my kids loved making these!
These are so CUTEEE! I am totally obsessed with this as a fun and easy (and healthy) Easter idea. Loving it!
How cute are these! Perfect for Easter, can’t wait to try them out with the kids!
These are so cute! Almost too cute to eat!
Those are the cutest things I’ve seen! I think my daughter will have a lot of fun making these.
HEY GIRL I LOVE THESE EASTER EGGS TOO
MY GRANDAUGHTERS SON’S DOG COUSINS WILL LOVE THESE AND THOURGHLY ENJOY COOKING THESE FOR EASTER 2044:)!!!!!!!!!!!!!!!!!!!!!!!!!!!!!!!!!!!!!!!!!!!
Cutting the egg whites were the hardest part of the recipe. I finally just cut them straight.
It does take some practice but the end result is worth it!
My family loved deviled eggs. I took these and they were well received. I plan on taking them again this year.
Thanks for the directions. I am going to attempt to make these for Easter this year.
I’m sure it’ll go well!